
Germinating cucumber seeds is an important first step for any gardener. Starting seeds before planting them in soil ensures higher success rates and saves time. By germinating seeds first, you can see which seeds are alive and ready to grow. This method works not just for cucumbers, but for other seeds like pumpkin, melon, squash, and beans.
Materials Needed for Germination
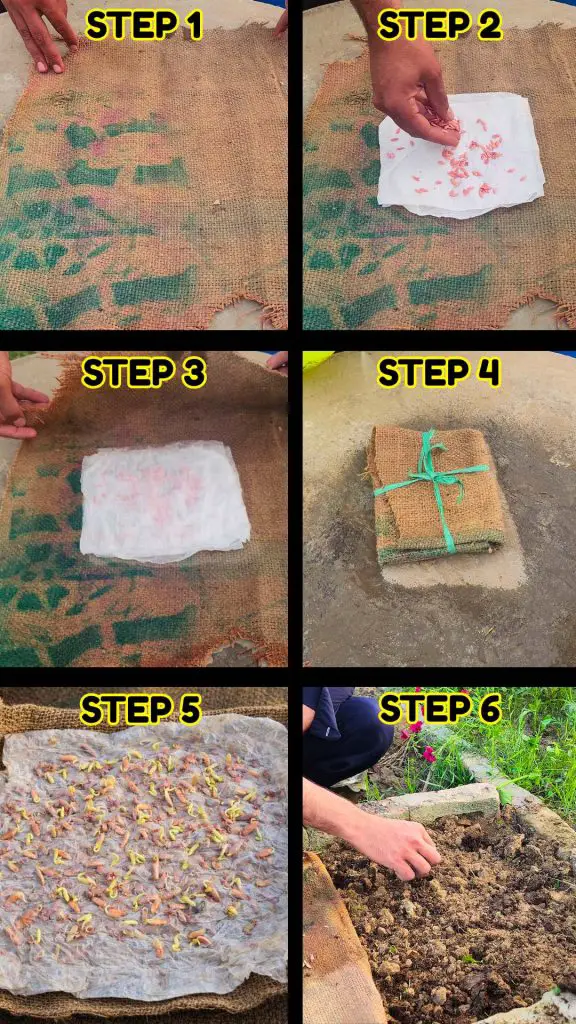
To start germinating cucumber seeds, you only need a few simple materials. A piece of burlap sack works best because it holds moisture and allows air to circulate. Tissue paper is needed to create a soft layer for the seeds to sit on. A spray bottle with water helps to keep the tissue moist without overwatering. Finally, you need a small shaded spot where the seeds can rest for a couple of days.
Preparing the Burlap and Tissue Paper
Spread the burlap sack flat on a clean surface. This will serve as the base for your seeds. Place a sheet of tissue paper over the burlap. The tissue paper holds water close to the seeds and protects them from moving around. Make sure the tissue covers the area where you will place the seeds.
Take your cucumber seeds and spread them evenly on the tissue paper. Leave a small space between each seed. Avoid piling the seeds on top of each other because this can cause them to get tangled or rot. When seeds have enough space, they can absorb water more efficiently and sprout properly.
Place another sheet of tissue paper on top of the seeds. This sandwiches the seeds between two layers of tissue paper. Moisture is retained on both sides, and the seeds are protected as the tiny roots begin to grow.
Spraying Water
Fill a spray bottle with water and lightly mist the tissue paper. Do not pour water directly, as too much water can move the seeds or make them soggy. The tissue paper should be damp but not dripping wet. The misting method ensures the seeds receive moisture evenly.
Wrapping the Seeds
Fold the burlap sack around the tissue paper and seeds. Wrap it carefully like a small parcel. This keeps the seeds in a humid environment and prevents them from drying out. Sprinkling a little water on the outside of the burlap helps maintain moisture inside the parcel.
Place the wrapped burlap parcel in a shady area where it will not get direct sunlight. Too much sun can dry out the parcel or overheat the seeds. A cool, shaded corner works well. It can be under a table, on a balcony, or in a shed.
Leave the parcel in the shaded spot for 48 hours. During this time, the seeds absorb water from the tissue paper. The outer shell softens, and a tiny root begins to emerge. After two days, most healthy seeds will start to sprout.
Checking the Seeds
Open the burlap parcel carefully. Inside, you will see many seeds with small white roots. Some seeds may not have sprouted, which is normal. This process helps identify which seeds are alive, so only these are planted in the soil.
Handle the sprouted seeds gently to avoid breaking the tiny root. Make a small hole in the soil using your finger. The hole should be shallow, just enough for the root to fit in comfortably. Place the sprouted seed in the hole with the root facing downward and cover it lightly with soil. Press gently to secure the seed in place.
After planting, water the soil gently. The soil should remain moist but not soggy. Moist soil helps the tiny roots grow and strengthens the seedlings. Check the soil regularly for moisture during the first few days.
Advantages of Pre-Sprouting Seeds
Pre-sprouting seeds saves time and avoids wasted effort. When dry seeds are planted directly in soil, some may not germinate. This requires replanting, which uses extra seeds and space. With pre-sprouting, you already know which seeds are alive and ready to grow.
Pre-sprouting helps use seeds wisely. Only the seeds that have sprouted are planted in the soil. This reduces empty spots in the garden and increases the success rate of seedlings. For small gardens or limited space, this method is particularly helpful.
While cucumbers are ideal for this method, it can also be applied to many other seeds. Pumpkin, melon, squash, beans, and peas respond well to pre-sprouting. This makes it a versatile technique for home gardeners who grow multiple types of plants.