
After a season of heavy monsoon rains and flooding, many gardeners find their garden beds in a terrible condition. The soil becomes compacted, covered with wild grass, and often waterlogged for weeks. But the good news is that even after such harsh conditions, your garden soil can be revived and made fertile again using simple and natural methods. It only takes a bit of time and care to turn it back into a productive space for growing healthy vegetables and plants.
Clearing the Weeds and Wild Grass
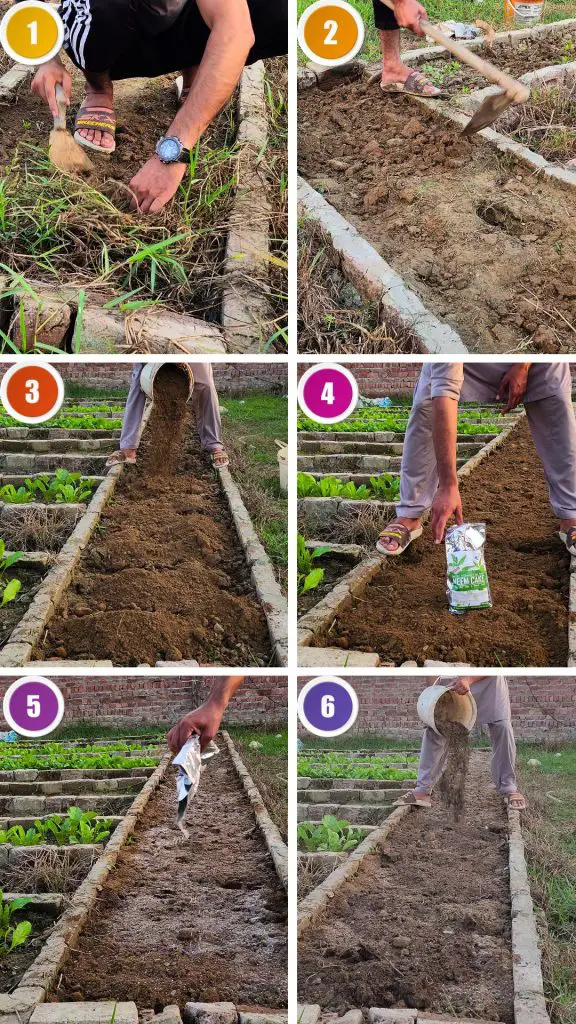
When floodwater drains away, the first thing you notice in the garden is the thick growth of wild grass and weeds. These unwanted plants take advantage of the moisture and nutrients left behind by the rain. The very first step in restoring the bed is to remove all of them completely. Use your hands or a small garden tool to pull them out from the roots. If you only cut them from the top, they will regrow quickly, stealing nutrients from your future plants.
After removing the weeds, take some time to clean the bed surface properly. Remove any debris, old roots, or dried stems. This cleaning process ensures that the soil will have good airflow and prevents pests or diseases from hiding in the remains of the old plants.
Turning and Loosening the Soil
Once the weeds are cleared, the next step is to make the soil fluffy again. Floods and heavy rains often compact the soil, reducing the air gaps that plant roots need to grow freely. Compacted soil also prevents water from draining properly, which can cause root rot later.
To fix this, use a shovel or a hand fork to gently turn the top few inches of soil. You don’t have to dig very deep — just loosen the upper layer. This helps reintroduce air into the soil and makes it lighter. While doing this, try to break large soil clumps into smaller pieces. A loose, crumbly texture is perfect for planting because it allows both water and air to move freely through the soil.
When the soil becomes light and airy, it also encourages beneficial microorganisms to multiply. These tiny organisms help break down organic matter and make nutrients available to plants naturally.
Raising the Soil Level with Loamy Soil
After heavy rains, garden beds often lose soil and become lower in level. Low-lying beds can hold water for too long, especially in future rain. To prevent this, it’s important to add more loamy soil on top. Loamy soil has a perfect balance of sand, silt, and clay, making it both well-draining and moisture-retaining.
Adding loamy soil not only raises the bed but also improves its structure. It ensures that when it rains again, water drains away easily instead of staying around the roots. A slightly higher garden bed is much healthier because excess water flows out naturally. This simple step can prevent a lot of future problems such as fungal growth, root rot, and soil erosion.
When adding loamy soil, spread it evenly over the bed. You can use your shovel or hands to smooth it out and lightly mix it into the loosened soil underneath. This creates a balanced foundation that’s ideal for planting vegetables and flowers.
Adding Neem Cake Powder for Protection and Fertility
Once the soil level is adjusted, it’s time to add natural amendments that improve fertility and protect the plants. One of the best organic materials for this purpose is neem cake powder. Neem cake is made from the residue of neem seeds after extracting oil. It’s an excellent organic fertilizer that works as both a nutrient source and a natural pest repellent.
Neem cake powder releases nutrients slowly into the soil, providing a steady supply of nitrogen, phosphorus, and potassium — the three main nutrients plants need for healthy growth. It also helps control harmful soil insects like nematodes, fungi, and certain bacterial infections. These pests often attack roots, but neem acts as a shield, protecting them naturally without the need for chemicals.
Another benefit of neem cake is its ability to improve soil structure and stimulate microbial activity. The microorganisms in the soil feed on neem compounds and increase in number, creating a living ecosystem that supports plant growth. By using neem cake regularly, your soil becomes healthier year after year.
Adding Bone Meal Powder for Strong Roots
Along with neem cake, bone meal powder is another wonderful natural amendment that boosts soil fertility. Bone meal is rich in phosphorus and calcium, two essential nutrients for plant development. Phosphorus is especially important for the early stages of plant growth, as it strengthens roots and supports flowering and fruiting later on. Calcium helps maintain healthy cell walls, ensuring that the plants grow strong and disease-resistant.
When you add bone meal to your garden bed, it works slowly, releasing nutrients over time. This slow release ensures that plants receive a continuous supply without the risk of burning roots. Bone meal also balances the soil pH slightly, making it ideal for most garden vegetables and flowering plants.
By combining neem cake and bone meal together, you give your soil a complete package of nutrients and protection — all in an organic, eco-friendly way.
Covering with Fully Decomposed Manure
After sprinkling neem cake and bone meal on the soil, the next step is to add a layer of fully decomposed manure or compost. Manure is one of the best sources of organic matter for any garden. It enriches the soil with nutrients, improves its structure, and helps it hold moisture better.
However, it’s very important to use only fully decomposed manure. Fresh manure contains high amounts of ammonia and strong acids that can burn plant roots. It can also carry harmful pathogens that might affect young plants. Fully decomposed manure, on the other hand, has gone through a natural breakdown process. It smells mild, feels soft, and is safe for all kinds of plants.
Adding this manure on top of the neem cake and bone meal creates a nutrient-rich upper layer. This layer will slowly release nutrients over time, feeding your plants naturally. It also supports beneficial earthworms and microorganisms that help keep the soil alive and active.
If you don’t have manure, you can use compost instead. Good quality compost provides similar benefits, adding both nutrients and organic matter that improve soil fertility and texture.
Mixing and Leveling the Soil
Once all the amendments are in place, take your shovel again and lightly mix the top few inches of soil. The goal is not to dig too deep but to blend the neem cake, bone meal, and manure evenly across the bed. Mixing ensures that nutrients are distributed well and that no layer is too concentrated in one spot.
After mixing, level the soil using the flat side of your shovel or a rake. A level surface helps with even watering and seed planting later. It also gives the bed a neat and tidy look, ready for the next stage of planting.
When the soil is mixed and leveled, you’ll notice that it feels much softer and smells fresh. This is a sign of healthy, living soil — exactly what your plants need to grow strong and productive.
Planting the Seeds
Now that the bed is fully prepared, you can start planting your seeds. Because the soil is rich, fluffy, and well-drained, most seeds will germinate easily. Make small furrows or holes depending on the type of seeds you’re sowing. Place the seeds gently into the soil and cover them lightly.
The newly added organic materials will support germination and early root growth. The neem cake will keep the roots safe from pests, while the bone meal and manure will supply nutrients as the seedlings grow.
Watering the Garden Bed
After planting the seeds, water the bed thoroughly. This first watering is very important. It helps the soil settle around the seeds and ensures good contact between the roots and the nutrients in the soil. The water also activates microbial life in the manure and neem cake, starting the process of nutrient release.
Make sure the water reaches deep into the soil but doesn’t flood the surface. Overwatering can wash away the seeds or compact the soil again. The goal is to keep the soil moist but not soggy. Once the first watering is done, keep an eye on the moisture level daily until your seeds start sprouting.