
Building a raised garden bed does not have to be expensive. Many people assume they must buy wood, metal sheets, cement blocks, or premade garden bed kits to grow vegetables successfully. But a productive raised bed can be made for free using simple materials already available in your garden.
This method is cost-friendly, sustainable, and ideal for anyone who wants to grow food without spending money. In this article, we will go through the complete process of creating a free raised garden bed using old bamboo sticks, food-grade sacs, garden soil, and a built-in composting system.
Every step is simple, practical, and suitable for beginners and experienced gardeners. By following this guide, you can turn waste materials into a fully functional gardening space.
Clearing and Preparing the Area
The first step in building a raised garden bed is selecting and clearing the area. Choose a spot that receives at least six hours of sunlight each day. Good sunlight ensures strong growth, healthy roots, and better harvests. Once the area is selected, remove weeds, stones, sticks, and anything that can interfere with the bed structure.
A clean surface helps the bed keep its shape and prevents pests from hiding in the lower layers. Make the soil level by lightly raking the surface. This step also helps you understand the natural slope of the ground. If the ground is uneven, the bed may tilt or lose soil after watering. Taking a few minutes to prepare the area ensures the raised bed remains stable for months and even years.
Marking the Bed Shape
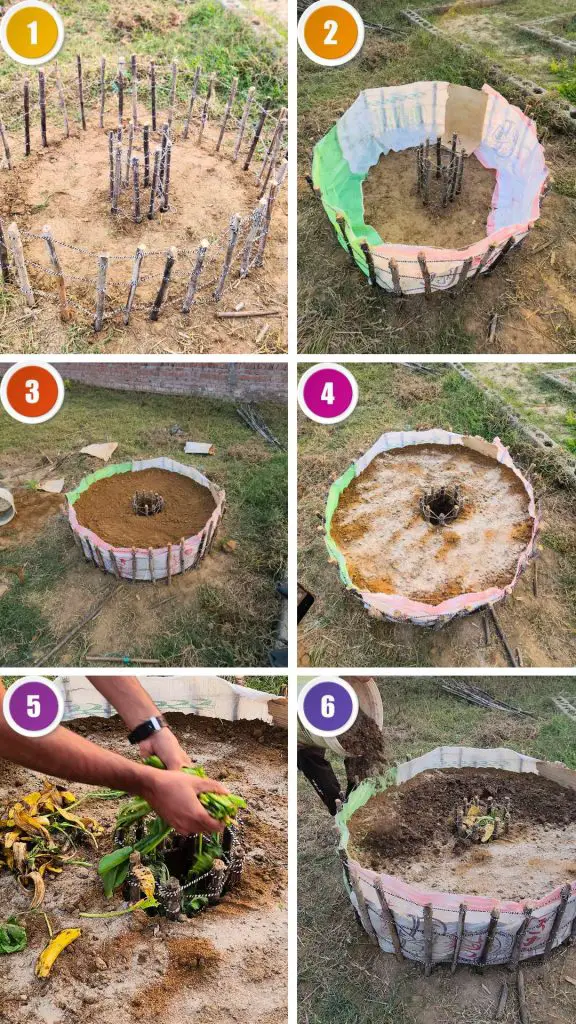
After preparing the area, mark the shape of the raised bed. Round beds are easy to build and maintain, but you can choose any design. Here we are making a circular bed because bamboo sticks naturally bend into a rounded shape and create a stronger form.
Use a long rope or stick to draw a rough circular outline on the soil. The size can be adjusted according to available space. A medium-sized circle works best for home gardens because it allows easy access from all sides. Make sure the markings are clear so you can place the bamboo sticks correctly around the border.
Reusing Old Bamboo Sticks for the Structure
Instead of buying new wood or bricks, we use old bamboo sticks. Many gardeners have leftover bamboo from last year’s trellises or support structures. These sticks are still strong enough to form walls for the raised bed. Place the bamboo sticks vertically along the marked circle.
Push each stick a few inches into the soil. This keeps them upright and gives the bed a natural and rustic appearance. Bamboo is durable, lightweight, and biodegradable, making it a perfect material for sustainable gardening. Once the sticks are arranged, secure each one by placing a small brick or stone against it. This prevents the bamboo from shifting when soil is added later.
Watch complete video here
Creating the Inner Composting Circle
One unique feature of this raised bed is the small circle in the center. This is not just decoration; it becomes a built-in composting chamber. Using the same bamboo sticks, create a smaller circle at the center of the bed. This circle only needs to be large enough to hold kitchen scraps and compost material. Push the bamboo sticks into the soil and secure them with stones or bricks just like the outer circle.
The purpose of this center circle is to turn the raised bed into an active composting system. As organic waste breaks down in the center, nutrients are released into the surrounding soil, feeding plants naturally. This is an efficient and eco-friendly way to provide ongoing nutrition without purchasing fertilizers.
Strengthening the Bamboo Frame with Rope
Once both circles are in place, the next step is strengthening the structure. Bamboo sticks may wobble or lean once soil is filled in, so tying them together with rope makes the entire frame strong. Wrap the rope around the bamboo sticks on the outer circle and pull it tight.
This ties all the sticks together like a fence. Do the same with the inner composting circle. A strong frame ensures the bed does not collapse or spread out over time. Rope also helps the bamboo maintain shape during heavy rains or when roots push outward. This simple step adds durability without needing nails or tools.
Lining the Inner Side of the Bed with Food-Grade Sacs
Now it is time to close the gaps inside the bamboo wall. We use old food-grade sacs such as rice bags, flour sacs, or grain sacks. These bags are strong, clean, and easily available in many homes. Cut them open if needed and place them along the inner walls of the bamboo.
Their purpose is to hold the soil inside and prevent it from spilling out between the bamboo sticks. The sacs also help retain moisture, which keeps the soil from drying too quickly. This is especially useful in hot climates. Using sacs makes the bed neat, clean, and long-lasting. Instead of buying landscape fabric, these old sacs do the job perfectly at zero cost.
Filling the Bed with Soil
After lining the bed, start filling it with soil. You can use garden soil, leaf compost, or any soil mix available in your yard. This project focuses on free gardening, so we use simple garden soil. Add soil in layers and level it gently with your hands.
Before adding more soil, sprinkle some bone meal and neem cake. Bone meal provides phosphorus for strong roots, while neem cake protects the soil from pests and improves plant health. These amendments are natural and safe. Continue filling the bed until it reaches your desired height. Leave a few inches of space at the top for compost.
Adding Kitchen Waste to the Composting Center
Now we come to the purpose of the inner circle. This center becomes a composting chamber where you add kitchen waste such as vegetable peels, fruit scraps, eggshells, tea leaves, and leftover plant material. Avoid adding meat or oily food. Add a few handfuls of ready compost over the kitchen waste. This introduces beneficial microbes that help break down the waste quickly.
As the kitchen waste decomposes, it releases nutrients into the surrounding soil. Plant roots naturally grow toward this nutrient source, making the raised bed highly productive. This method reduces household waste and provides continuous organic fertilizer for your plants.
Covering the Bed with a Thick Compost Layer
Once the soil is filled and the composting center is set up, cover the entire bed with a thick layer of compost. Compost improves soil texture, increases moisture retention, and provides essential nutrients for plant growth.
Spread the compost evenly, making sure it covers the entire surface. A rich compost layer makes planting easier and helps seeds germinate faster. This final layer acts as a blanket that protects the soil, prevents weed growth, and encourages earthworms to move in.
Mixing the Top Layer
After adding compost, gently mix the top few inches of soil. This helps combine soil, compost, bone meal, and neem cake. Mixing ensures nutrients are evenly distributed across the bed. It also helps soften the surface layer, making it ideal for planting vegetables, herbs, or flowers. Do not mix too deep; only blend the upper layer so the composting center remains intact.