
Sometimes we forget that gardening tools, just like plants, need attention and care. We often focus so much on watering, pruning, and nurturing our plants that we overlook the very tools that make all of it possible. That’s exactly what happened when our pruning shears were accidentally left outside during days of continuous rain.
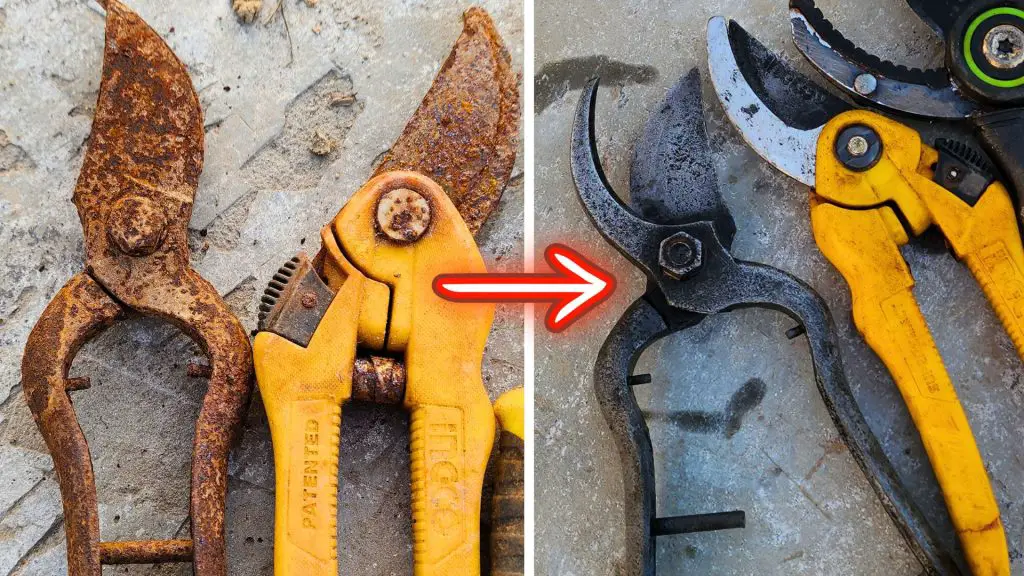
When we finally noticed them, they were submerged in water and completely covered in rust. The blades were locked tightly, the handles were stiff, and the once shiny surface had turned dark and rough. It looked hopeless at first, but we decided not to give up. What followed became a satisfying process of restoration — turning rusted metal back into smooth, shining steel.
Discovering the Power of White Vinegar
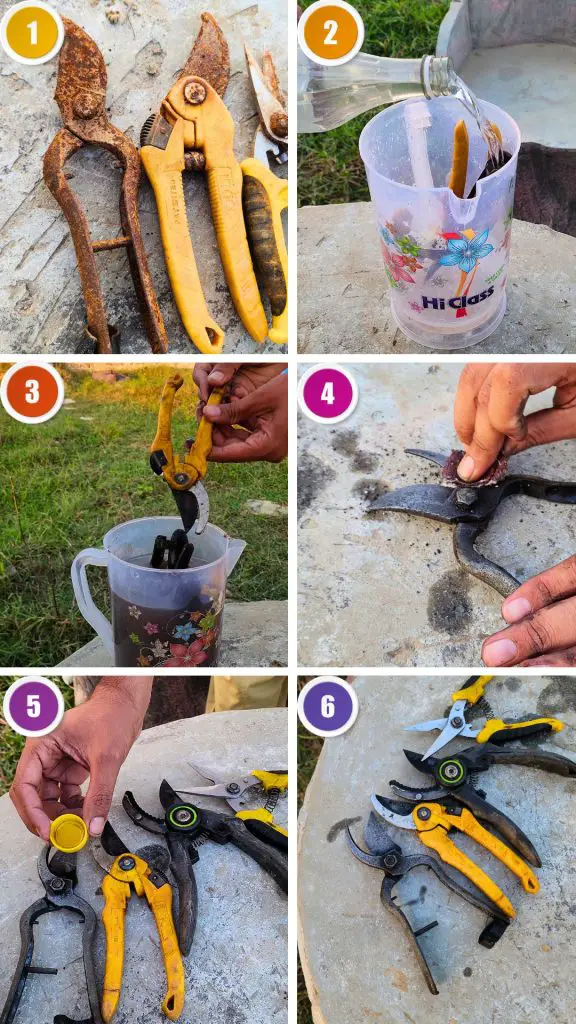
We began by finding a container deep enough to fully submerge the shears. Then came the key ingredient: white vinegar. This simple liquid, something found in nearly every kitchen, holds an impressive ability to remove rust. The secret lies in its acetic acid content.
Rust, which is scientifically known as iron oxide, forms when metal reacts with moisture and oxygen over time. The acid in white vinegar reacts with the iron oxide and helps dissolve it, breaking the bond between the rust and the metal underneath.
When the shears were placed in the vinegar, small bubbles began forming around the rusted areas. That was a clear sign the reaction had started. The acid was eating away at the rust layer, loosening its grip. We made sure the shears were fully covered and left them to soak for about twenty-four hours.
This slow process allowed the vinegar to do its job thoroughly. White vinegar may not act instantly, but its gentle and natural cleaning power makes it one of the safest and most effective rust removers you can use at home.
The Results After Soaking
When the shears were removed from the vinegar the next day, the transformation was surprising. Most of the rust had vanished, leaving behind a dull but clean metal surface. The parts that had once been completely brown and crusted were now visible again.
A soft brush or even a cloth can be used at this stage to wipe off the loosened rust, but some stubborn patches usually remain. These small spots tend to cling tightly, especially in corners or around the bolts where the blades meet. That’s where the next step comes in — a little sanding and polishing to bring back the shine.
Removing the Remaining Rust with Sandpaper
We took a piece of fine sandpaper and started gently rubbing the remaining rusty areas. Sandpaper helps scrape away what the vinegar couldn’t dissolve. It’s important not to rush this part; applying steady, even pressure helps remove rust without scratching or damaging the metal underneath. As we worked, the dull metal began to shine again. The smooth surface started to appear, and the rough edges disappeared.
While sanding, we also focused on the blades. Sharpening them slightly while cleaning saves time and improves the cutting performance later. Sharp blades are essential in gardening because dull ones don’t make clean cuts.
Instead, they crush stems and branches, leaving plants more vulnerable to disease and slower to heal. Clean, sharp cuts help plants recover quickly and grow stronger. That’s why maintaining sharp tools is just as important as keeping them rust-free.
After sanding, we wiped the shears with a dry cloth to remove all traces of rust and dust. This also ensured there was no remaining moisture, which could cause new rust to form. By this point, the shears already looked much better — shiny, clean, and almost like new. But there was one more important step left to bring them fully back to life.
Restoring Smooth Movement with Oil
The nut and bolt connecting the two blades were still a bit stiff from the rust damage, so we used a few drops of oil to fix that. Oil plays two key roles in tool maintenance: it reduces friction and prevents moisture from causing future rust. Any light machine oil or even a few drops of vegetable oil can work in this situation.
We added oil to the moving joint and opened and closed the shears repeatedly, letting the oil spread evenly. The change was immediate — what had once been stiff and unmovable now opened and closed smoothly.
The blades glided against each other effortlessly again, just like they did when the shears were new. That satisfying motion reminded us why oiling tools regularly is so important. It doesn’t take much time, but it can make a big difference in both performance and durability.