
Starting a new garden is always exciting—more space, more vegetables, more possibilities. But when the soil is empty of nutrients, it can feel like you’re working with a blank canvas that just won’t hold any paint. That was exactly our challenge when we began building our new and much bigger garden. We had loamy soil, which is great in texture but sadly poor in nutrients.
Good soil is the foundation of any successful garden. Plants need more than just sunlight and water—they need a rich, living soil full of beneficial microbes, nutrients, and worms that help the whole system thrive. In this article, we’re going to walk you through exactly how we turned dead, lifeless loamy soil into a living, fertile garden bed in just a few days. No expensive fertilizers, no store-bought compost—just natural amendments and smart layering.
Let’s get started!
Understanding the Soil We Had: Loamy but Lifeless
Loamy soil is actually considered the best type for growing vegetables. It’s made from a balanced mix of sand, silt, and clay. This means it drains well, holds moisture without getting waterlogged, and has a nice, crumbly texture that roots love. But good texture isn’t everything. If your loamy soil has been left unattended, overused, or hasn’t been enriched for years, it might not have the nutrients your plants need.
That was the case for us. The structure was there, but the life in the soil—the nutrients, the microbes, the organic matter—was gone. So we had to rebuild from scratch.
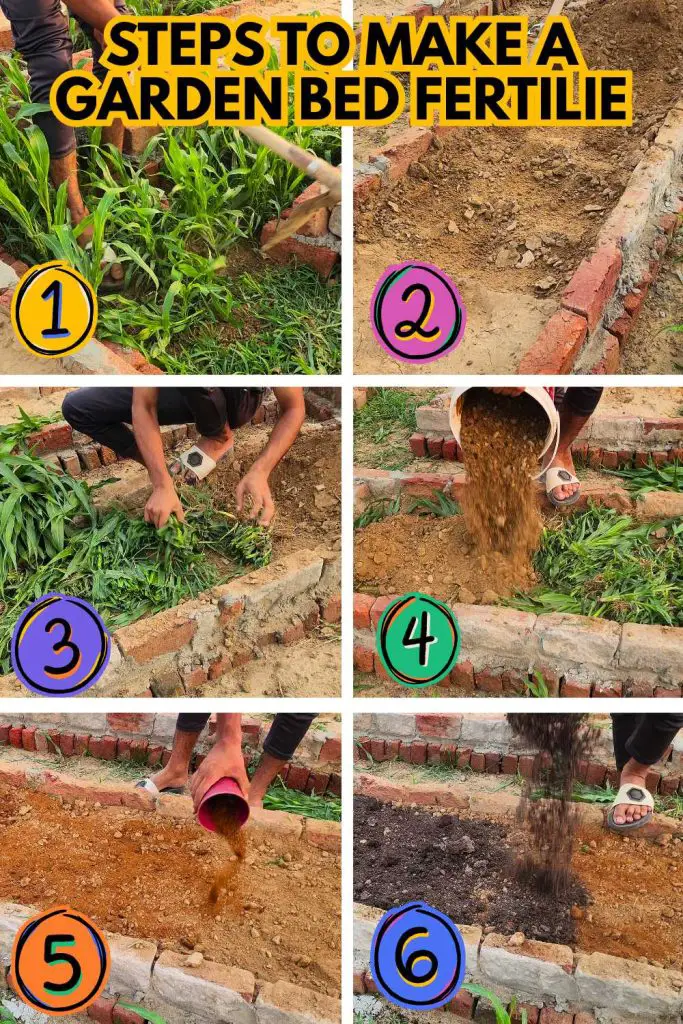
Step 1: Remove the Top Layer of Soil
To start the process, we removed the top few inches of soil from our garden bed. This step might feel unnecessary, but it helps in a big way. By removing this layer, we made space to introduce organic materials like green matter and compost. Don’t throw this soil away—you’ll need it again soon.
We set this soil aside carefully in a pile near the bed and moved on to the next step.
Step 2: Use What You Have – Cover Crops as Green Manure
Since this was new land, a cover crop had been planted earlier. Cover crops like mustard, alfalfa, or clover are often planted before vegetables to keep weeds down, protect the soil from erosion, and improve soil structure. Now that it was time to grow food, we had to clear it out—but we didn’t just pull and discard.
Instead, we pulled out the cover crop and tore it into small pieces by hand. Why tear it? Smaller pieces decompose faster, breaking down into nitrogen-rich green manure. We spread these torn plant pieces evenly over the entire bed. This simple step brought natural nitrogen and organic matter directly into the root zone.
Step 3: Cover It Back with Loamy Soil
Next, we took the soil we removed earlier and spread it back over the green crop layer. This acts like a natural compost blanket. It helps keep the green material moist and warm, which speeds up the decomposition process. It also prevents insects from carrying away the green matter or strong sunlight from drying it too quickly.
We made sure to level the soil nicely, not pressing it down too much but making it even and neat.
Step 4: Add Neem Cake – A Natural Soil Protector and Fertilizer
After covering the bed, we sprinkled a layer of neem cake. This is a powerful, natural material made from neem seeds after oil extraction. It’s commonly used in organic gardening as both a fertilizer and a pest repellent.
Neem cake provides nutrients like nitrogen, phosphorus, and potassium, but its real power lies in its protective qualities. It keeps harmful soil pests, like root-knot nematodes and fungal pathogens, away. At the same time, it doesn’t harm the good guys—earthworms, helpful microbes, and beneficial insects.
By adding neem cake, we ensured the bed wouldn’t just grow food—it would grow it safely, without the stress of hidden enemies under the soil.
Step 5: Add a Layer of Vermicompost – Bring the Soil to Life
Next comes the magic layer—vermicompost. This compost is made with the help of earthworms and is one of the richest organic fertilizers you can use. Vermicompost doesn’t just feed the plants; it wakes up the soil.
Here’s what vermicompost does:
- Adds beneficial microbes that help break down organic material and feed plant roots.
- Improves soil structure by making it airy and crumbly.
- Helps the soil hold moisture without becoming too wet.
- Encourages natural earthworms to move in and stay.
We added a generous layer of vermicompost all over the bed, about 1 to 2 inches thick. Just like that, the bed already looked richer, darker, and more alive.
Step 6: Deep Watering – The Most Important Final Step
Once everything was layered—green material, loamy soil, neem cake, and vermicompost—it was time for a proper, deep watering.
Water is essential because it kick-starts the decomposition process. It soaks into the cover crop pieces, activates the neem cake, and helps the microbes in the vermicompost spread through the soil. If the soil stays too dry, nothing will break down, and your bed won’t develop the richness it needs.
We didn’t just sprinkle—we gave it a thorough soaking, letting the water go deep into the bed. The goal is to help all the layers settle, mix, and come to life.
If your weather is hot and dry, you might need to water again the next day or cover the bed with mulch to keep the moisture in.
The Results: A Living Garden Bed in Days
After just a few days, we could already feel the difference in our bed. The soil felt softer, smelled richer, and even looked darker. The presence of earthworms was a good sign—they were already starting to show up, which meant the bed was turning into a living ecosystem.
We didn’t use any chemicals, expensive store products, or complicated equipment. Just natural materials—what we had on hand—and a smart layering approach.
This bed will now serve as the perfect foundation for growing healthy vegetables. Plants growing in this bed will have access to nutrients, better root support, and protection from harmful pests and diseases—all while being grown the organic way.
Why This Method Works So Well
This process is simple, but powerful. It combines multiple layers of goodness that work together:
- The green matter (cover crop) provides nitrogen and organic material.
- The loamy soil keeps everything buried and holds structure.
- Neem cake adds both nutrients and protection from pests.
- Vermicompost introduces microbes and improves soil health.
- Water activates it all, bringing life and movement into the soil.
It’s a mini composting system right inside the garden bed—no need for a separate compost pile or bin.